How to Draw 3D Shapes. 3D shapes are all around us, and everything we see is made from them.
Also, check our Unicorn Coloring Pages.
The challenge with 3D shapes is how to represent them on a 2D page, and many people wonder if they can learn to draw 3D shapes.
Luckily, if you know what to do, it can be possible and easy to do once you know the steps!
If you want to know how you’ve come to the right place!
This step-by-step guide to drawing 3D shapes will show you how easy it can be!
How to Draw 3D Shapes
Step 1
For this first step of our guide to drawing 3D shapes, we’ll start with a square that turns into a cube.
If you have a ruler, it would be very helpful for this step. Use your ruler to draw a square whose sides are as equal as possible. Once we have that, let’s move on to the next step!
We’ll draw a triangle shape for this step of drawing the 3D shapes. This is another step where having a ruler handy would be very useful.
The bottom line of the triangle, which will be the shortest to read picuki, will also be slightly tilted. You can see how it should look in our reference image!
This image will also help you understand what the two longest lines should look like.
Step 2
We’ll draw a triangle shape for this step of drawing the 3D shapes. This is another step where having a ruler handy would be very useful.
The bottom line of the triangle, which will be the shortest, will also be slightly tilted. You can see how it should look in our reference image!
This image will also help you understand what the two longest lines should look like.
In this third step of our guide to drawing 3D shapes, we will create a trapezoid shape.
This shape looks like a rectangle, except the line on the right side is long and diagonal, while the top and bottom lines aren’t the same either.
This is another step where a ruler would come in handy!
If you’ve never seen a shape like this, the reference image will help you see what it should look like.
Now that you’ve drawn the basic shapes let’s add the 3D effect in the next few steps.
Step 3
In this third step of our guide to drawing 3D shapes, we will create a trapezoid shape.
This shape looks like a rectangle, except the line on the right side is long and diagonal, while the top and bottom lines aren’t the same either.
This is another step where a ruler would come in handy!
If you’ve never seen a shape like this, the reference image will help you see what it should look like.
Now that you’ve drawn the basic shapes let’s add the 3D effect in the next few steps.
In this step, we will draw the 3D aspects of your 3D shapes. The reference image shows you what these next few lines should look like as they go “backward” into the image’s background.
These lines are drawn from the bottom right corner of each shape to the top of the image.
The triangular shape has a line going up with an angle forming part of the base.
Three lines rise from the cube shape, forming an elongated square on the left.
Finally, three lines are added to the trapezoidal shape to create another elongated square shape.
It may seem like it takes work now, but the image will be useful as a visual reference when drawing!
Step 4
In this step, we will draw the 3D aspects of your 3D shapes. The reference image shows you what these next few lines should look like as they go “backward” into the image’s background.
These lines are drawn from the bottom right corner of each shape to the top of the image.
The triangular shape has a line going up with an angle forming part of the base.
Three lines rise from the cube shape, forming an elongated square on the left.
Finally, three lines are added to the trapezoidal shape to create another elongated square shape.
It may seem like it takes work now, but the image will be useful as a visual reference when drawing!
In this fifth step of our guide to drawing 3D shapes, we’ll draw the last sides of each shape.
For the triangular pyramid shape, another line is needed between the lower right corner and the top apex. You should be able to draw it easily with your ruler!
Once it looks like the reference image, you can finish the trapezoid.
The final lines of the trapezoid shape can also be tricky when it comes to getting the angles right, so it’s another step where you can pencil before going over it with a pen once you’re happy.
Step 5
In this fifth step of our guide to drawing 3D shapes, we’ll draw the last sides of each shape.
For the triangular pyramid shape, another line is needed between the lower right corner and the top apex. You should be able to draw it easily with your ruler!
Once it looks like the reference image, you can finish the trapezoid.
The final lines of the trapezoid shape can also be tricky when it comes to getting the angles right, so it’s another step where you can pencil before going over it with a pen once you’re happy.
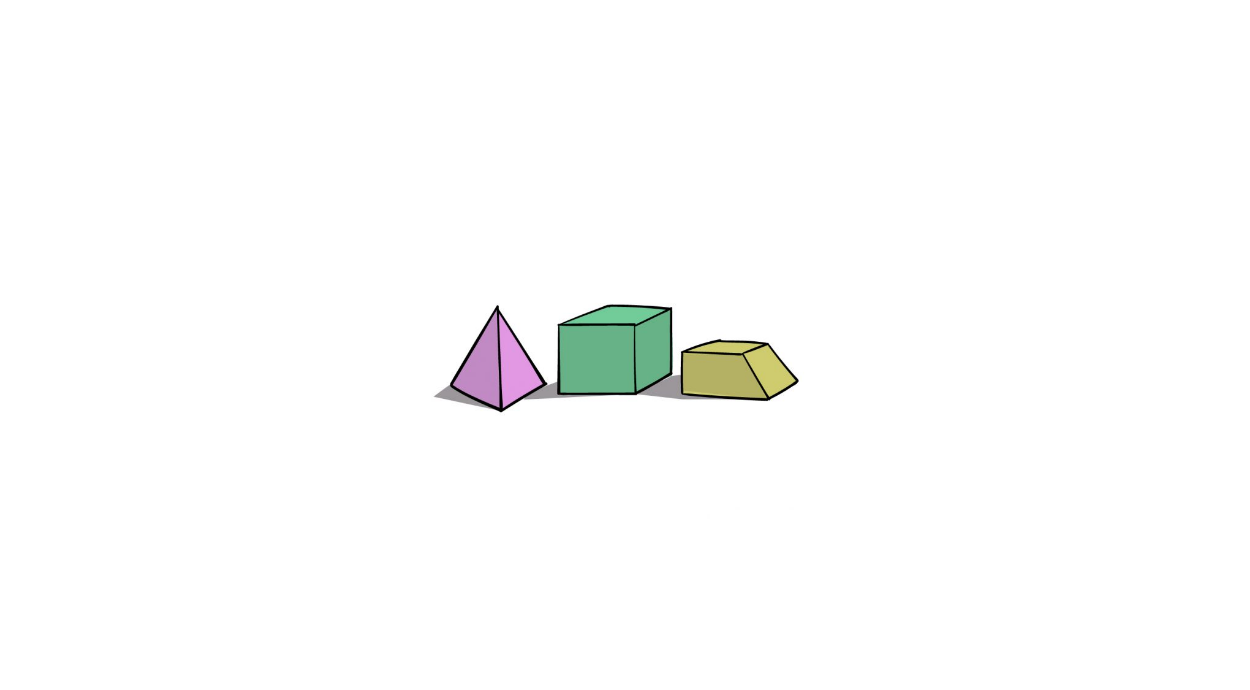
This drawing of 3D shapes might have looked a bit tricky, but in this final step, you have all the tricky parts done and can relax with some coloring fun!
For our reference image, we used purple for the triangle shape, green for the cube, and yellow for the trapezoid.
While these are the colors we chose, this is the step where you can let your creativity run wild!
These shapes you’ve drawn could be any color you can imagine, so you should make them look however you like.
However, picking a few of your favorite colors is just one way to do it. You can also color them with a wood or metal texture to make them look like they’re made of a different material.
You can also feel free to play with some cool art mediums! A fun thing to try would be to use a different art medium for each shape.
Step 6
This drawing of 3D shapes might have looked a bit tricky, but in this final step, you have all the tricky parts done and can relax with some coloring fun!
For our reference image, we used purple for the triangle shape, green for the cube, and yellow for the trapezoid.
While these are the colors we chose, this is the step where you can let your creativity run wild!
These shapes you’ve drawn could be any color you can imginn, so you should make them look however you like.
Learn about manga18fx
However, picking a few of your favorite colors is just one way to do it. You can also color them with a wood or metal texture to make them look like they’re made of a different material.
You can also feel free to play with some cool art mediums! A fun thing to try would be to use a different art medium for each shape.
Your 3D Shapes Drawing is Finished!
